K8s/OpenShift Resource Management
Something that can seem unclear when working with OpenShift (and K8s) is how it works with resources. How much is available for me and my application? How do I make sure that my application gets the resources it needs?
From a more administrative point of view it is perhaps more interesting to know how I avoid single applications and users from using too much of the cluster’s resources. How is the distribution of resources done?
In OpenShift (and k8s) we use several different components to make sure that our applications and users have the resources they need while at the same time, individuals can’t seize the entire capacity of the cluster.
We do this, mainly, by using carefully designed Quotas, LimitRanges, Requests and Limits. I will briefly describe below how these components work and how they are related to each other, but before that, I will explain the scheduling process in a simplified manner.
The Scheduling Process
The object that is responsible for placing our workload on our nodes is called the Scheduler. This object does this by running all nodes through a set of filters to determine the most suitable location for our application. The primary factor that is being used is compute resources.
Compute resources such as CPU and Memory are derived from the nodes that are part of the cluster. These nodes will have two interesting resource fields, namely Capacity and Allocatable. Capacity tells us the total compute resource of the node and Allocatable how much of that is available for our workload.
Capacity:
  cpu:                16
  ephemeral-storage:  91970284Ki
  hugepages-1Gi:      0
  hugepages-2Mi:      0
  memory:             31970284Ki
  pods:               250
Allocatable:
  cpu:                9
  ephemeral-storage:  89463813686
  hugepages-1Gi:      0
  hugepages-2Mi:      0
  memory:             14241976Ki
  pods:               250
Below I have illustrated how this Scheduling Process looks like.

Requests and Limits
When we deploy our application in a cluster, there are no limits to how much resources it can use. It will be placed on one of the available nodes by the scheduler at the time of deployment and thereafter it can go ahead and use the node’s resources as needed.
This is usually not desirable as it can easily lead to various problems. To a name a few:
- There are no barriers for the application to use excessive amounts of resources (due to memory leaks or other problems), thus limiting resources for other applications in the cluster.
- The scheduler does not know which node would have been the best to place the application on. This is because it has no idea about the expected use of resources.
- Resources become “first come, first served”, which can lead to a very uneven distribution of resources among different teams.
To get around this, we use Requests and Limits in our deployments.
resources:
  requests:                               <   Reserve these resources
    cpu: “4m”
    memory: 12Mi
  limits:                                 <   Do not allow the application to exceed these values
    cpu: “1”
    memory: 2Gi
A Request is simply a way for us to reserve resources for our application. As we deploy the application, we attach a request to reserve a certain amount of resources for it. The node that then houses our application will see a drop in its allocatable resource pool, corresponding to our request. The consequences of this are mainly that:
- We make sure that the scheduler places our application on a suitable node with sufficient resources to fulfill our request.
- The resources are being reserved from the chosen node’s resource pool. The scheduler will not take these reserved resources into consideration for future applications regardless whether we actually use them or not.
We can thus ensure that our application will have better conditions to operate in. It is important to note that a Request does not limit the amount of resources an application can use. Also remember that these reserved resources are taken from the node’s allocatable resource pool, which affects the scheduling process, they can still be utilized by any application running on the node as long as the application is not hindered by something like a limit.
A Limit is the actual restriction we place on our application in the form of resource use. We can use these to protect ourselves against scenarios where our application for some reason would start using unnatural amounts of resources.
OpenShift handles CPU and Memory differently. If we set a limit of 1 CPU core for our application and it tries to use more, OpenShift will start a CPU throttling.
If we instead have a limit of 1Gi memory for the application and it tries to go over, the application will be restarted after it has become OOM.
Defining good Requests and Limits
It can be difficult to set appropriate values for both requests and limits. This is largely due to the many different factors that affect this. What is the application written in? How much will it be used? What is the purpose of it? How much can resource use differ over time and use? And so on.
However, to facilitate the process there are some guidelines we can follow.
When we make our request, we can take the actual resource use over time and then add 15-25% to our request. If it is a new application for which there is no data, it is important to estimate the approximate use, for example by looking at similar applications, and then add 15-25% more.
The reason why it is smart to place the request slightly higher than the actual use is to create a buffer for the application.
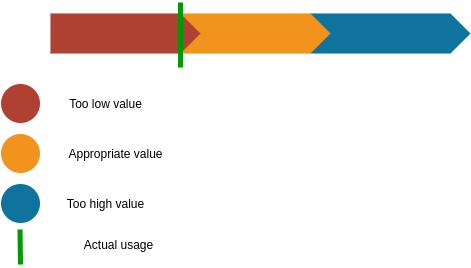
What we want to avoid with setting too low requests is that the application ends up in situations where there are no available resources that it actually needs.
If, on the other hand, we have far too high requests, it means that we withhold resources from others that we actually do not need anyway. If we start setting way to high resource requests, soon there wont be any node to schedule or applications on due to all the resources being reserved from the allocatable resource pool. Further, if enough people make far too high requests for their applications, we will also create a kind of artificial lack of resources in the cluster. The actual resource use can be relatively low while the majority of the resources are reserved and not available.
When we instead set Limits on our applications, we should take into account the consequences of setting too low and high values.
In the same way as for requests, we want to avoid setting too low values on our limits as we can end up in situations where the application cannot handle bursts of resource usage.
If we know that our application usually needs significantly more resources at certain times, we should take this into account when setting our limit. Do we have a higher need for resources at start-up, for example? At certain times of the day?
If we set too high limits, we allow the application to use high amounts of shared resources. This can lead to other applications having problems.
When we set limits, we should try to find the middle ground for our specific application.
Overcommitment
When we deploy our applications, we can never make a request that is higher than what is available in the cluster. This is because it is not possible to reserve resources that do not exist. At the same time, it is quite possible to set a limit on our application that is higher than the cluster’s available resources. When we do this, we make an overcommitment.
In many cases, as I mentioned earlier, it is desirable to set a higher limit than request. This, among other things, to manage potential spikes of resource use. However, it is good to be aware that this has some consequences.
An overcommit really only means that the application can use more resources than it has been allocated (via requests). The application is, as said, placed on a node based on the amount of resources specified in its request. In other words - if we have a request for 1Gi memory, it ends up on a node that can guarantee 1Gi memory.
However, if the application also has a limit of 2Gi memory, it is possible for it to use up to 2Gi memory even if there are no guarantees that the node can provide the application with it. The difference between our Request and Limit will also be our overcommitment.
A node is overcommited when it has a pod placed on it that has no request defined at all, or if the sum of all the limits of the pods running on the node is greater than the node’s actual capacity.
When we create these overcommitments, it becomes easier for us to use the cluster’s resources efficiently. One consequence, however, is that it becomes theoretically possible that a large number of applications need access to these extra resources at the same time and we can then encounter problems as the node/s capacity is not enough for everyone. When this happens, the node prioritizes pods according to Quality of Service - which can be read more about in the references.
We can see how much a node is overcommited by inspecting it. We do this most easily by describing the node.
oc describe node/<node-name>
Quotas
If the configuration for it is not in place, there are really no limits to how much resources a user can use. By setting up quotas, however, we can guarantee a certain amount of resources per user / namespace. So what is a quota?
spec:
  hard:
    limits.cpu: “24”             #1
    limits.memory: 24Gi
    pods: “45”
    requests.cpu: “12”           #2
    requests.memory: 12Gi
  scopes:
  - NotTerminating               #3
- Amount of resources in limits that we can request.
- Amount of resources in requests that we can ask for.
- The scope of the quota.
Simply described, it is a configuration that determines the amount of resources we can request. Note that this has nothing to do with the actual use of resources but instead is linked to Requests and Limits.
Quotas can be set at both user level (OpenShift) and namespace level. Note that when quotas are configured, we must specify requests and or limits in our deployments. In other words, if we have a quota where we set the number of requests that are available, we need to specify requests in our deployment. The same applies if we set a quota on limits.
Since this can easily lead to problems, you usually combine quotas with another object. Namely LimitRanges.
LimitRanges
A LimitRange is an object that allows us to limit how much resources individual pods and / or containers may use in a namespace. It also allows us to set default values that are used in the event that our applications have not defined requests / limits.
apiVersion: v1
kind: LimitRange
metadata:
  name: example-limitrange
spec:
  limits:
  - default:                   < #1
      memory: 1Gi
      cpu: “2”
    defaultRequests:           < #2
      memory: 128Mi
      cpu: “50”
    max:                       < #3
      cpu: “4”
      memory: 5Gi
    min:                       < #4
      cpu: “25m”
      memory 32Mi
    type: Container            < #5
- Default limits that are set if we do not actively define limits in our deployment
- Default requests used if we do not actively define requests in our deployment
- Maximum values we are allowed to specify in our deployment
- Minimum values we are allowed to specify in our deployment
- The object we are referring to. Can be a Container or Pod.
Once we have configured a LimitRange with default values, we have also made it possible to deploy applications without specifying Requests and or Limits. What happens is that the default values will be applied at the time of deployment.
Configuring LimitRanges
When we configure LimitRanges, it is important to understand the different options available. In my opinion, especially the ones I marked in the example above.
When we set a value for default and defaultRequest, this will be used every time an application has not specified its own values. It is therefore important to place these at generally acceptable values.
By setting a maximum value, we can avoid users setting far too high values in their applications.
In the same way, we avoid that the values are too low when we choose a minimum. Something that is good to keep in mind is that it is possible to set low minimum values and thus use less of the quota. However, a low minimum value allows more flexibility for users to set more accurate values.
The interplay
To illustrate the interaction between these components, I have produced the following examples.
Example 1 - unconfigured namespace
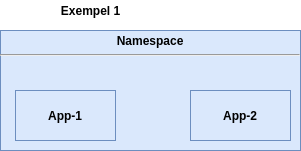
In example 1, we have a namespace where we deploy two applications. These applications have no limits on how much resources they can use. They will be scheduled on nodes that are available.
Example 2 - namespace with Resource Quota

In example 2, we have applied the following quota:
spec:
  hard:
    limits.cpu: “24”
    limits.memory: 24Gi
    pods: “45”
    requests.cpu: “12”
    requests.memory: 12Gi
  scopes:
  - NotTerminating
We have therefore decided that in this namespace you can make requests for a total of 12 CPU and 12Gi memory. In addition, you can set limits of up to 24 CPU and 24Gi memory.
When this quota is met and we try to deploy a new application, it will not work, as our quota is out. We will see the cause of this in the namespace event logs.
It is also not possible to deploy any application in this namespace if it has not specified requests and limits. We will instead discover that our pods do not come up even though our deployment / deploymentConfig does. By reading the event logs, we see the error message that informs us about our problem.
Our applications will be placed on nodes that meet our requests for resources. We thus get a better scheduling process.
Example 3 - namespace with Resource Quota and LimitRange
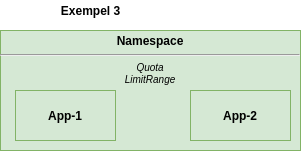
In example 3, in addition to the quota, we have also applied the following LimitRange.
apiVersion: v1
kind: LimitRange
metadata:
  name: example-limitrange
spec:
  limits:
  - default:
      memory: 1Gi
      cpu: “2”
    defaultRequests:
      memory: 128Mi
      cpu: “50”
    max:
      cpu: “4”
      memory: 5Gi
    min:
      cpu: “25m”
      memory 32Mi
    type: Container
With this LimitRange we have decided that each Container max may request 4 CPU and 5 Gi memory. They must request at least 25 millicores and 32Mi of memory.
In addition to this, we have set default values. Unlike when we only had our quota, we can now deploy applications without setting requests and limits. What happens instead is that our application retrieves the default values, from the limitRange, at the time of deployment and uses these.
We can still define our own values as long as these do not exceed the maximum or go below the minimum requirements of our LimitRange.
Conclusions
Resource management in K8s/OpenShift is handled by several different components and these are the main ones. A lot of issues with cluster resources boils down to a lack of understanding of how this works and how the different parts work together.
Requests determine the actual resources you reserve for your application. Limits set the values you cannot have the application exceed.
Quotas are the amount of resources you are allowed to specify in Requests and Limits (not actual usage)
LimitRanges set the maximum amount of resources we are allowed to request as well as the minimum. They also allow us to make use of default values which are taken into effect if no requests/limits are specified.
References
- https://docs.openshift.com/container-platform/4.8/applications/quotas/quotas-setting-per-project.html
- https://docs.openshift.com/container-platform/4.8/nodes/clusters/nodes-cluster-limit-ranges.html
- https://docs.openshift.com/container-platform/4.8/nodes/clusters/nodes-cluster-overcommit.html
- https://docs.openshift.com/container-platform/4.9/nodes/scheduling/nodes-scheduler-about.html